Technique
Finger Dexterity
the amount of repetitions, and eventually you can increase the tempo of the metronome.
i. 1, 1, 1, 1, 2, 2, 2, 2, 3, 3, 3, 3, 4, 4, 4, 4, 5, 5, 5, 5, 6, 6, 6, 6
ii. 1, 1, 2, 2, 3, 3, 4, 4, 5, 5, 6, 6
iii. 1, 2, 3, 4, 5, 6, 5, 4, 3, 2, 1
iv. Now switch up the order! For example, 1, 3, 2, 4, 3, 5, 4, 6
b. Students should first be watching their fingers in order to maintain proper hand position, but can later transition
to looking up since they won’t be able to look at their fingers while they are playing their instrument.
6. You can also start introducing fingerings through these exercises. For example, a clarinet student could now say and
finger 1: E, 2:D, 3:C, 4:Bb, 5:A, 6:G.
- Have students relax their arms and hands out to their sides and look at the natural curve of their fingers.
- Bending only from the elbows (no wrist bends), students bring their hands to a general playing position as if they were holding their instrument.
- Students place their fingers on a standard six-flat-sided pencil in the order their fingers would go on their instrument. All finger pads will be placed on the same flat side of the pencil, thumbs on the back.
-Students will see that the curve of the hand and fingers is exactly the same as it was when their hands were relaxed down at their sides. - Students can practice lifting each finger up about a half inch above the pencil and placing it back in the same spot. Enforce finger height, speed, precision, knuckle movement and relaxation.
- Turn on metronome (80 bpm works great) and have students move their fingers on the pencil in tempo. Students should say out loud which finger they are moving. (Establish a label for each finger for kids to say. Examples: 1, 2 , 3, 1, 2, 3 or 1, 2, 3, 4, 5, 6 or Pointer, Middle, Ring, Pointer, Middle, Ring, etc. Initially leave the pinkies out of these exercises, except make sure they don’t float away or tuck under the pencil.
the amount of repetitions, and eventually you can increase the tempo of the metronome.
i. 1, 1, 1, 1, 2, 2, 2, 2, 3, 3, 3, 3, 4, 4, 4, 4, 5, 5, 5, 5, 6, 6, 6, 6
ii. 1, 1, 2, 2, 3, 3, 4, 4, 5, 5, 6, 6
iii. 1, 2, 3, 4, 5, 6, 5, 4, 3, 2, 1
iv. Now switch up the order! For example, 1, 3, 2, 4, 3, 5, 4, 6
b. Students should first be watching their fingers in order to maintain proper hand position, but can later transition
to looking up since they won’t be able to look at their fingers while they are playing their instrument.
6. You can also start introducing fingerings through these exercises. For example, a clarinet student could now say and
finger 1: E, 2:D, 3:C, 4:Bb, 5:A, 6:G.
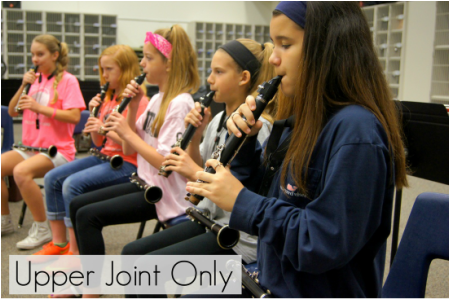
Upper Joint Only
Give students only the part of the clarinet they need. Label the rest of the clarinet and take it from students.
Give students only the part of the clarinet they need. Label the rest of the clarinet and take it from students.
- Isolate one hand position at a time
- Right hand on barrel helps to keep proper mouthpiece placement and correct embouchure
- Only add lower joint when all notes are successfully executed and pitch is consistent
- Heads up: C and C# will sound almost identical since the lower joint is missing
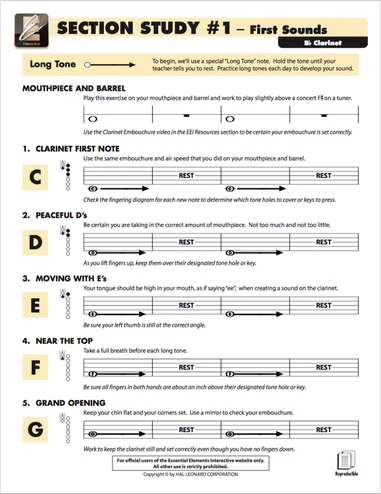
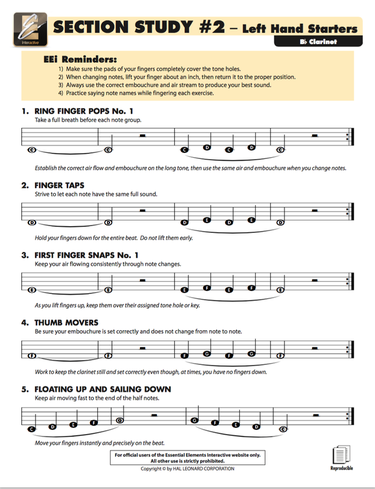
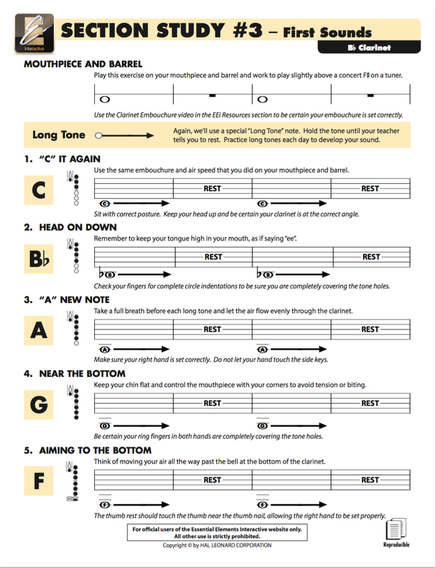
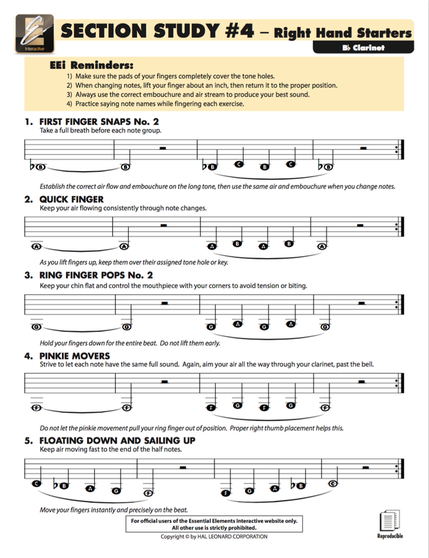
Upper Joint Exercises from Essential Elements Interactive
These exercises are great for just the upper joint, and can be played without tonguing.
These exercises are great for just the upper joint, and can be played without tonguing.
|
|
Lower Joint Exercises from Essential Elements Interactive
These exercises are great for adding the lower joint, and can be played without tonguing.
These exercises are great for adding the lower joint, and can be played without tonguing.
|
|
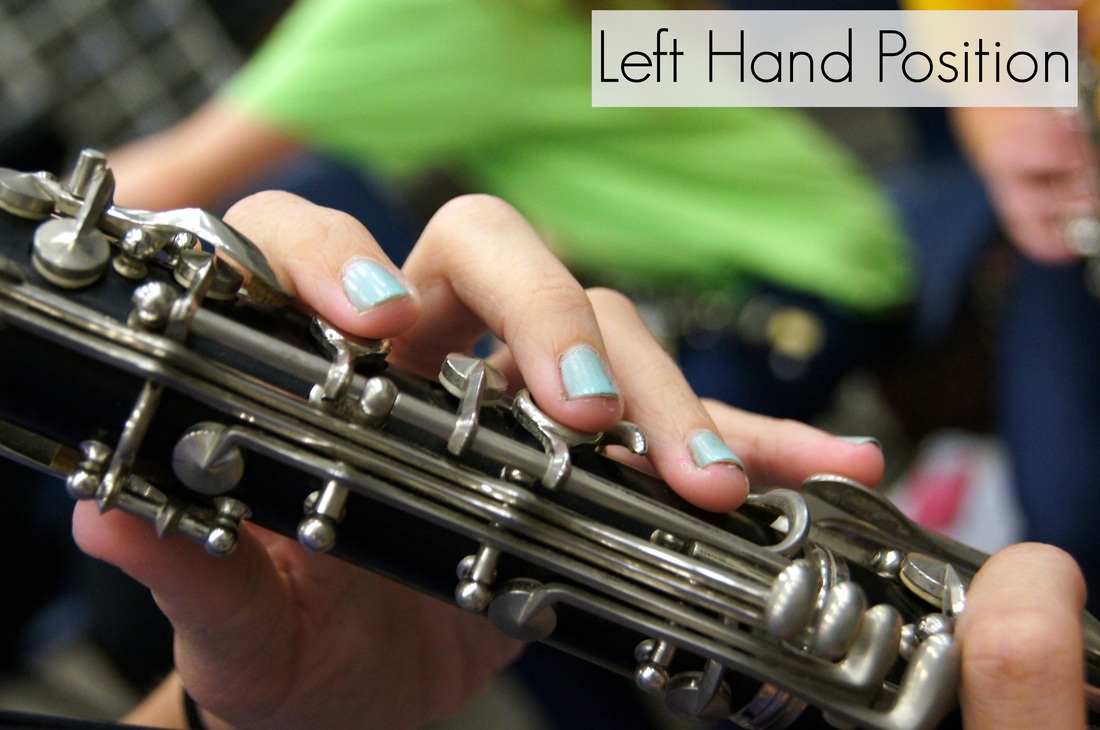
Hand Position
Continuously walk in front of and behind students to check their hand positions. Check for the following:
Continuously walk in front of and behind students to check their hand positions. Check for the following:
- Curved hands
- Hovering fingers
- Fingers sealing the holes completely, especially right hand (check for "Cheerio" circles on pads of fingers)
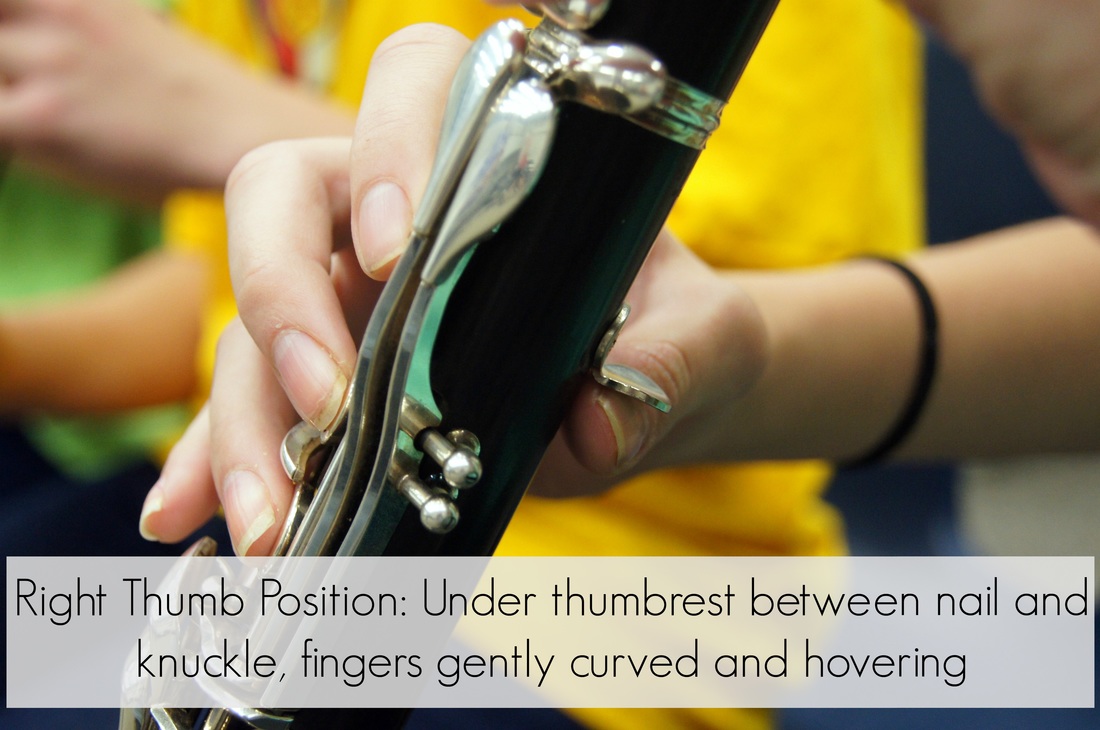
- Right thumb under thumb rest between nail and knuckle
- Left thumb pointing to 1 o'clock
- Left thumb never moving down to touch back of clarinet
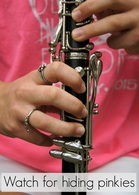
- Pinkies on top of clarinet and not sneaking behind the clarinet
- Right hand not touching rod or side keys
|
|
|
Neck Straps
Neck straps are a great way for beginners to gradually build muscle without compromising hand position. Free fingers will lead to fast technique. I like the BG France Clarinet Support Strap and Neotech Clarinet Neck Strap.
Neck straps are a great way for beginners to gradually build muscle without compromising hand position. Free fingers will lead to fast technique. I like the BG France Clarinet Support Strap and Neotech Clarinet Neck Strap.
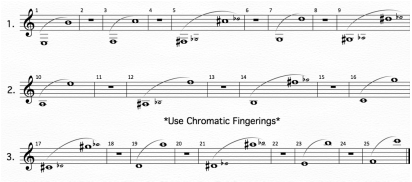
Register Slurs
Register Slurs are a great way to maintain even air and tone in the higher notes. As students advance, they can alter the rhythms, articulations, dynamics, etc.
Register Slurs are a great way to maintain even air and tone in the higher notes. As students advance, they can alter the rhythms, articulations, dynamics, etc.
|
|
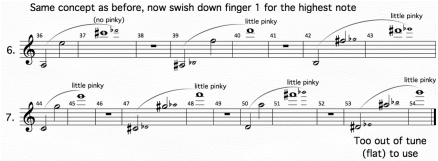
When students are comfortable slurring to high C, they are ready for the altissimo register slurs. Trick: swish up finger one instead of popping the finger. The swish motion will vent the air to the altissimo notes faster. Watch for the little pinky that should go down for high D and higher. Since the notes will often respond without the pinky, it is easy for kids to not realize they are forgetting it.
|
|
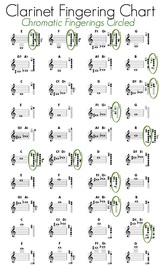
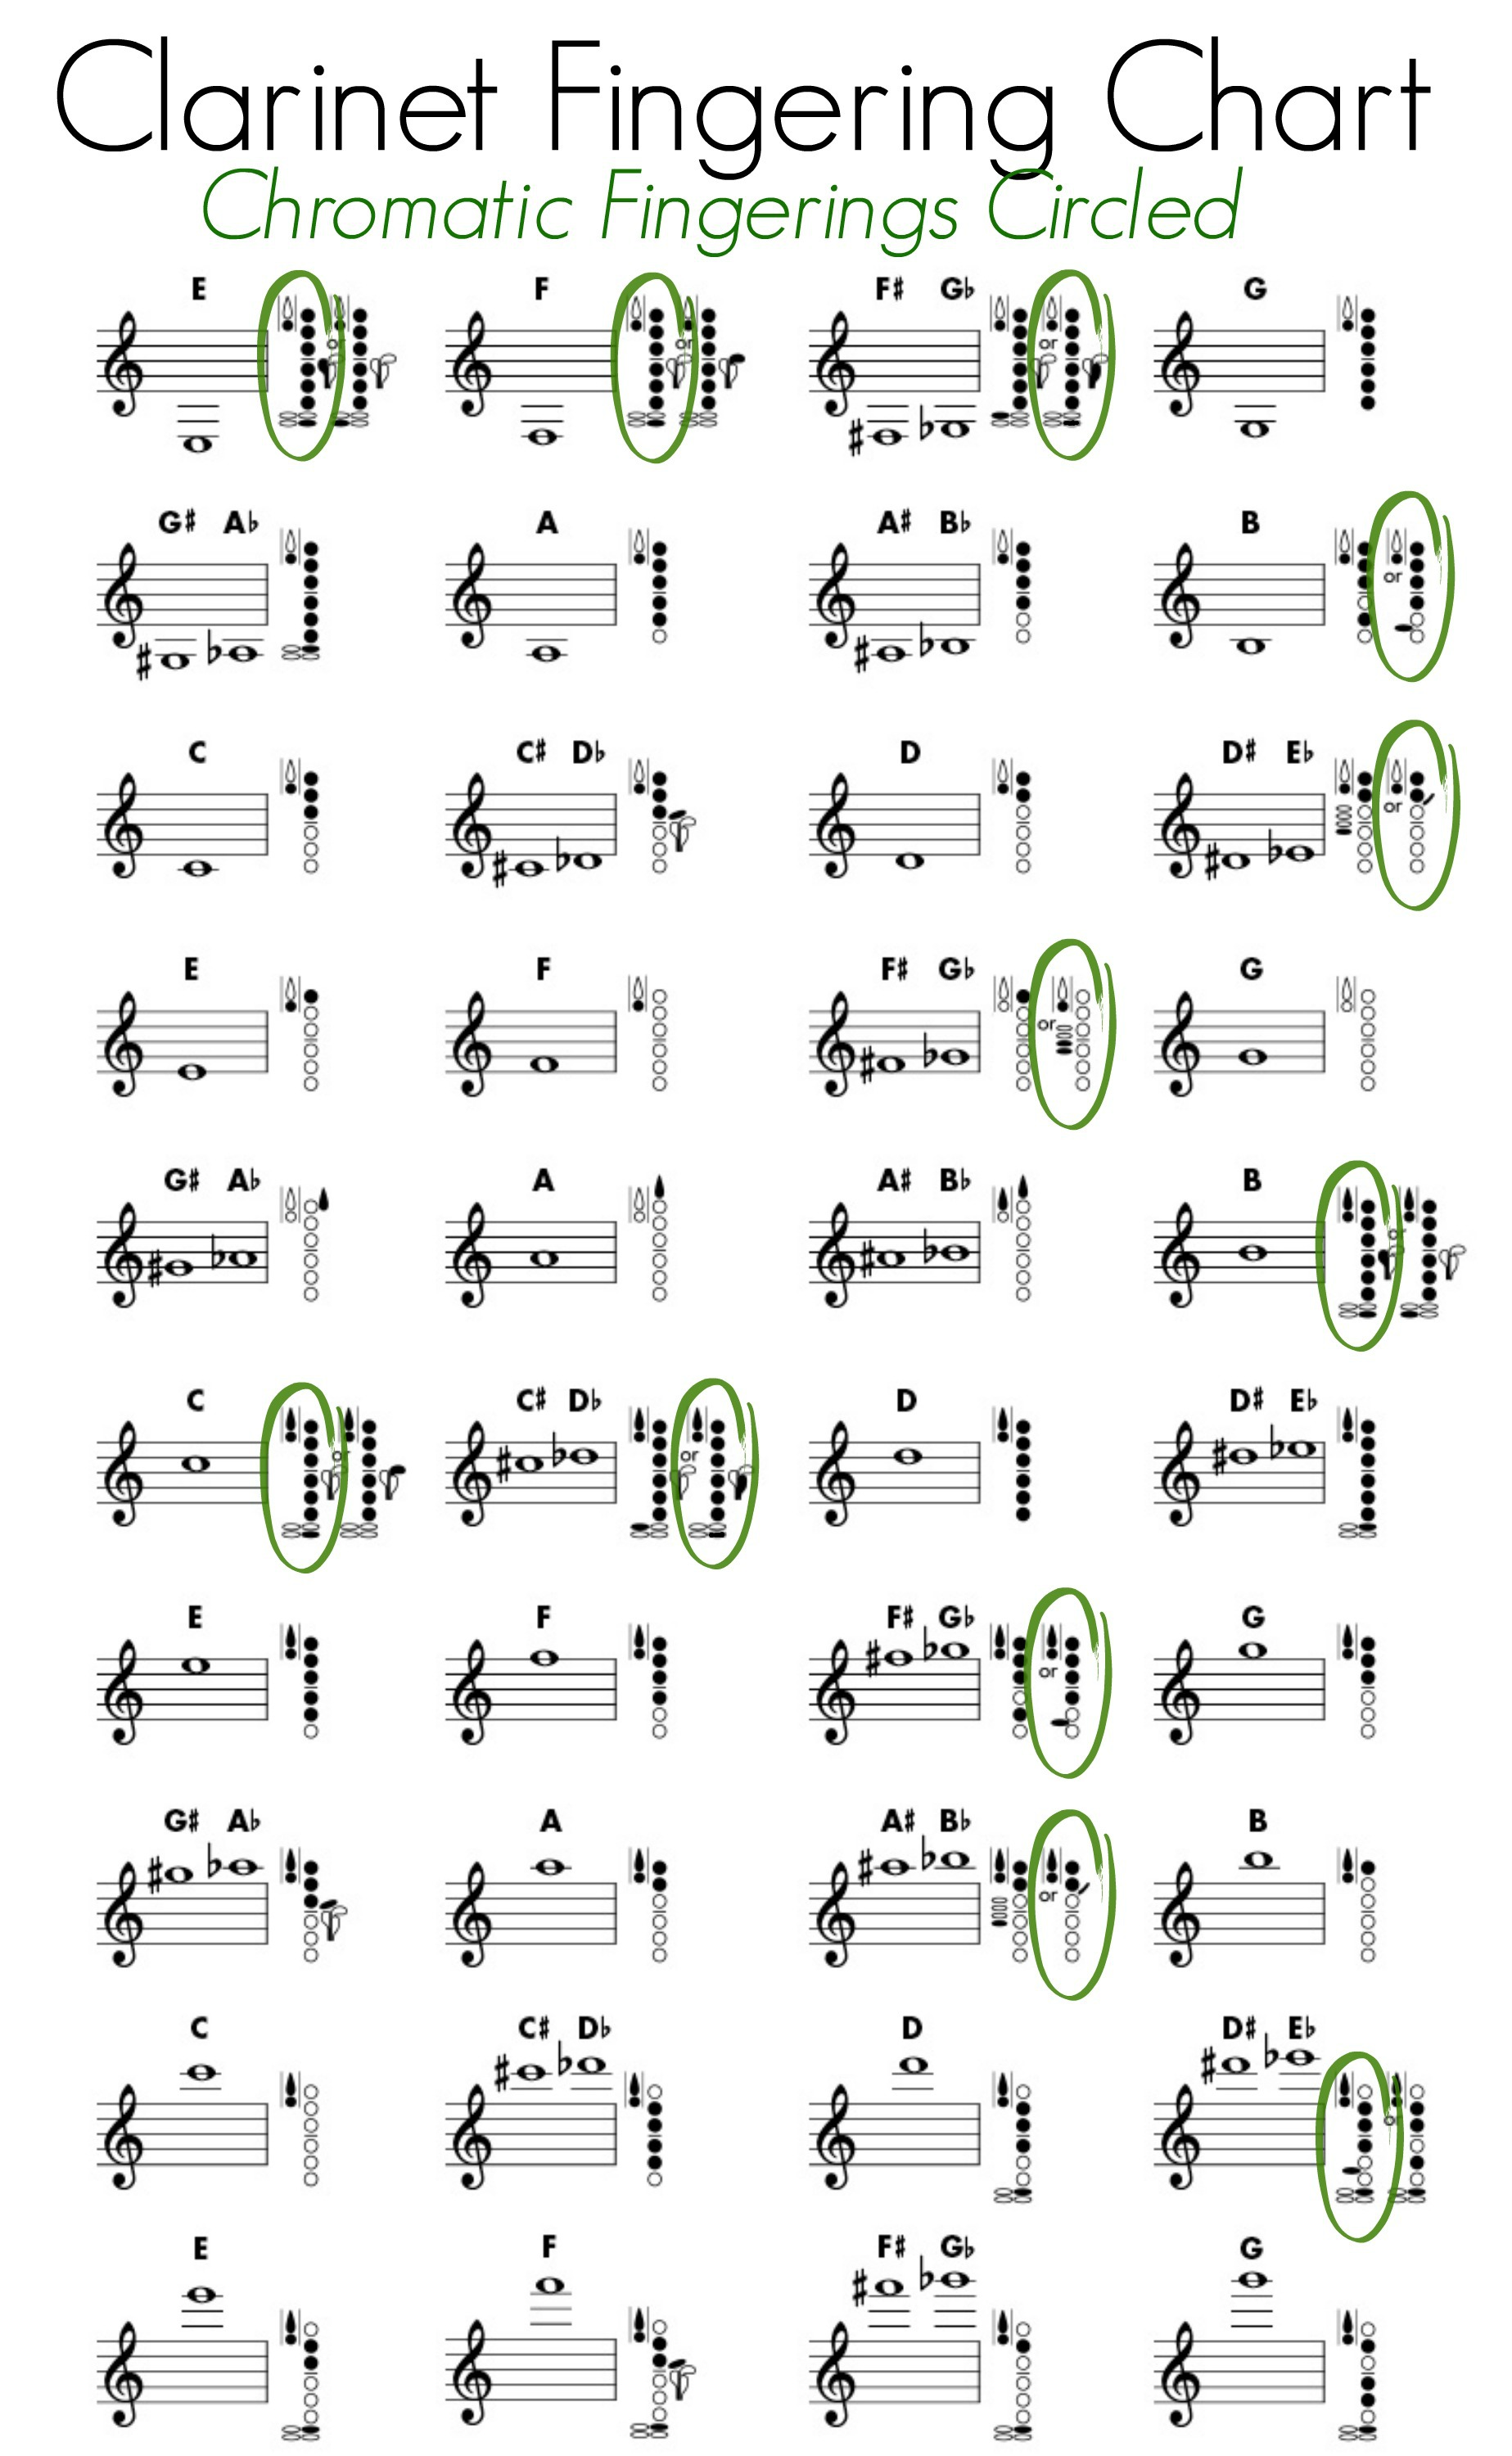
Chromatic Scale
Click here for a larger image.
- Teach as soon as possible!
- Have students read from a fingering chart that goes up to high G. Circle chromatic fingerings when there is more than one option.
Click here for a larger image.
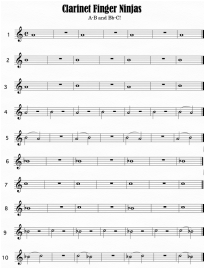
Help Over The Break
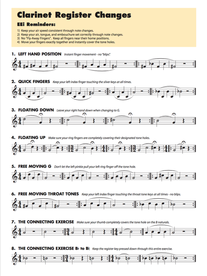
The right hand should stay down and not move for the entire Finger Ninjas exercise. Click here for a printable version of "Clarinet Finger Ninjas". Click here for a printable version of "Clarinet Register Changes" (Thank you to Hal Leonard for this pre-release) |
|
